OOAK

All posts tagged OOAK

It’s Been Forever

Published March 30, 2017 by baileyquillincooper

It’s been forever. It’s honestly been so long that I kind of don’t even want to bother going into everything that’s happened to me since November. I’ve also been so stressed out over the past couple of months that I hardly even remember any of it. So here’s the extremely condensed version, in bullet points.

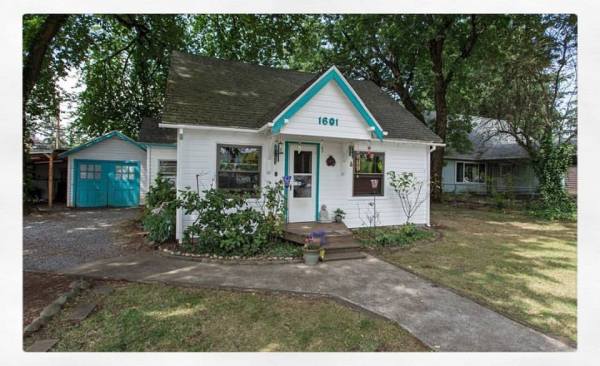
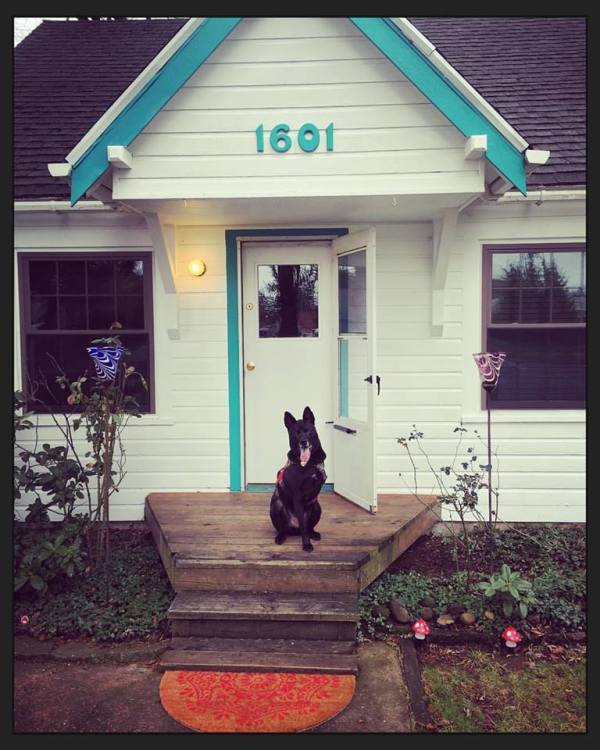
  • We bought a house. It’s our very first one, it looks like a fairytale cottage, and it is perfect.
  • Immediately after moving into the new house in early December, we got slammed with four freak blizzards that hit not even a week apart from each other. Well really, it was more like four and a half. After Portland Snowpocalypse IV in January 2017, which was the biggest and the baddest of them all and gave us an entire foot of snow overnight, we also got hit with a final ice storm just for good measure.
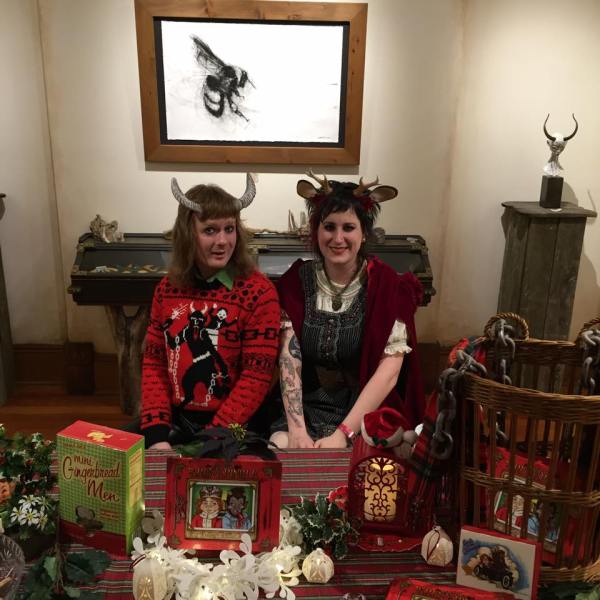
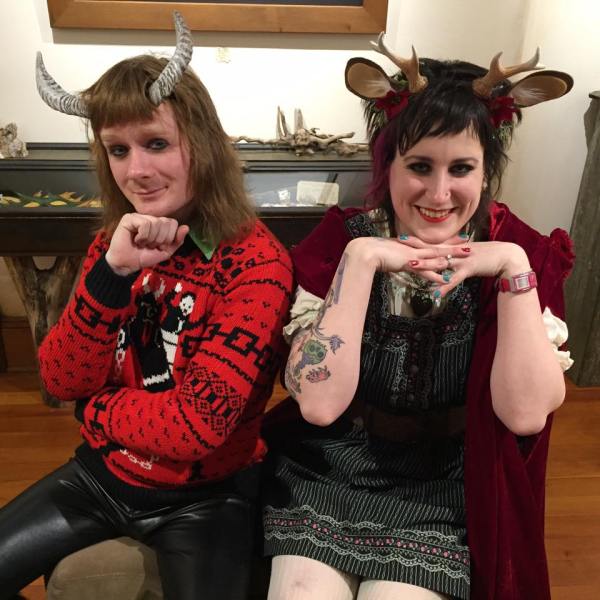
  • The flurry of the holidays came and went, and as promised my book was released on Amazon on Krampusnacht, December 5th, 2016. Between prolonged moving drama, DIY home improvements, blizzards, blizzard-related car troubles, fulfilling mountains of Kickstarter rewards for my books campaign, and a minor concussion from slipping on the ice and cracking my head on our new front steps, we somehow still managed to throw our first Yule housewarming party at our house, and I somehow still managed to have that book release party at The Fernie Brae. Toby Froud even came to the party to buy a signed copy for his son, Sebastian. It was truly unreal!
  • I also got to participate in my first tabling event for my book, the Eyeball Burp Zine East Portland Holiday Bazaar at the Jade/APANO Multicultural Space. It was the first year of this particular event and was a lot of fun despite all of the stressful things we were going through at the time. I really hope to do it again this year, as well as a lot of other events like it (since I should presumably have a lot more time for this kind of thing the second time around.) My book has been for sale at The Fernie Brae and Vine Gogh, the painting studio where I teach classes, but the next time around I hope to have more time to market it to all the indie bookshops like I had originally planned. Honestly with the way everything went down at the end of last year, I was super lucky to have even accomplished all that I did, so I really can’t complain!
  • Just as soon as we thought things were finally starting to calm down a little in February, Grendel squeezed through a gap in our fenced front yard to chase after another dog, was hit by a truck right in front of our house, and then ran away. We were both home when it happened but neither of us had actually seen the accident occur. I was inside of the house and Martyn was outside with Grendel when it happened. Martyn was just around the side of the yard taking out the trash when he looked up to see Grendel tearing down the street at an unnatural pace. Although Martyn is a really fast runner, Grendel was completely terrified and running so fast that none of us could catch him, and we soon lost sight of where he had gone. There was a good hour when we couldn’t find him, even with the help of the man in the truck who had hit him, a random bystander on a bicycle, Martyn in my Beetle and me on foot calling his name everywhere around the park and the neighborhood. Luckily the man on the bike happened to see Grendel run into the yard of a neighbor who lives on the other side of the park. The woman who lives there and the man on the bike discovered Grendel hiding behind a shed in her garden. Grendel then went to the emergency vet where it was determined that he had no broken bones or serious injuries, only some significant bruising and all his nails worn down to the quick from running so frantically. It took many difficult nights of doggie painkillers, assisting him in lying down and standing up, and dealing with an obvious bout of PTSD, but eventually, he recovered.
  • In March we got zapped big time on our taxes due to a silly error on a W-4, celebrated St. Paddy’s Day with our friends regardless, and then Martyn found out that he was being laid off from his job at the magazine. This was of course in many ways completely terrifying for us, but we were also both in many ways ready for a major change. When we found out that Martyn would be losing his job in two weeks, we just tried our best to stay calm and view it as another blessing in disguise. Martyn put together a gorgeous illustrated resume and went door to door searching for anywhere that would take him. He was hired at a local pub a week later, where we both suspect that he will actually be much happier. His orientation was yesterday and he will probably be starting his training next week.
  • The latest incident has been Grendel tearing up our house while we’re gone for the past couple of days. We’re not exactly sure what the issue is, but it’s all pretty extreme and out of nowhere. The latest unusual theory involves my old phone that Martyn had decided to keep for himself and use just for Spotify. A few days ago it apparently “woke up” on its own while inside of a drawer, and proceeded to sound off alert bings and buzzes for every text message that had been received on the current phone all year. Martyn realized that this could possibly be the cause of Grendel’s sudden and unexplained freak-outs when he was home with Grendel today, heard the old phone in the drawer buzz and his own phone bing with a Facebook notification, and observed Grendel waking from a deep sleep to start panting, drooling, growling, and trying to look out the window to determine where the sounds were coming from. We really hope that we might have solved it this time, but we’ve bought him another crate just in case. Unfortunately even that won’t fix our shattered blinds or all of the other damage he caused…but this is just another big expense and stressful situation that we have no choice but to get through.
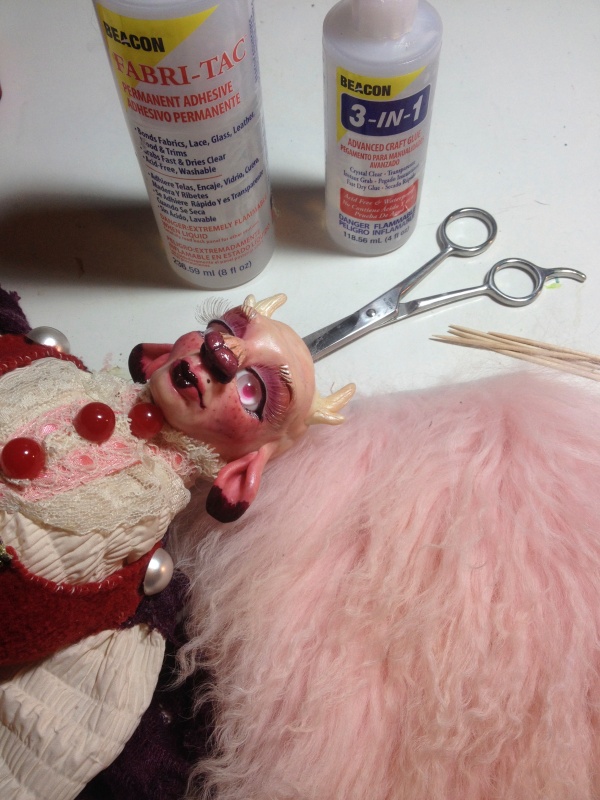
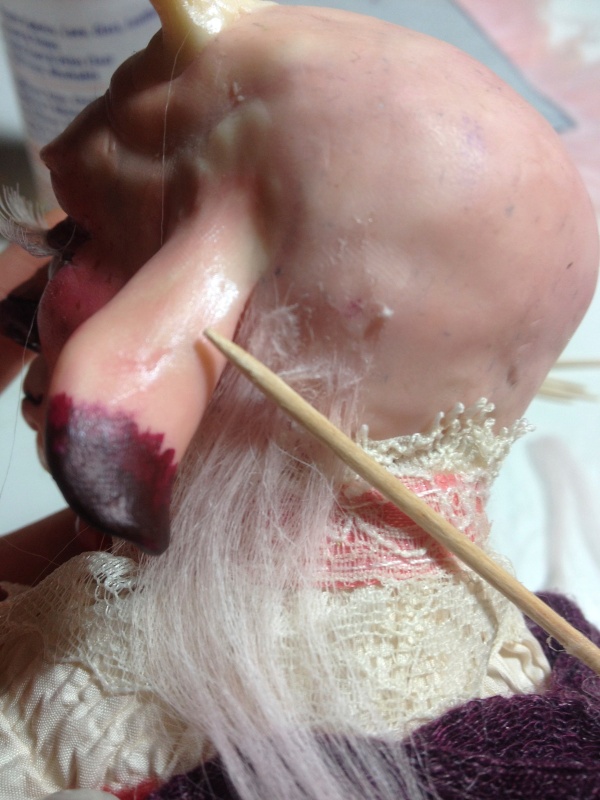
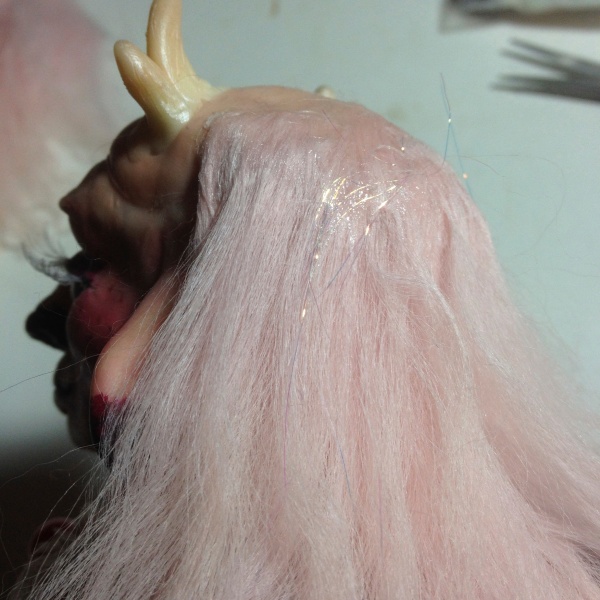
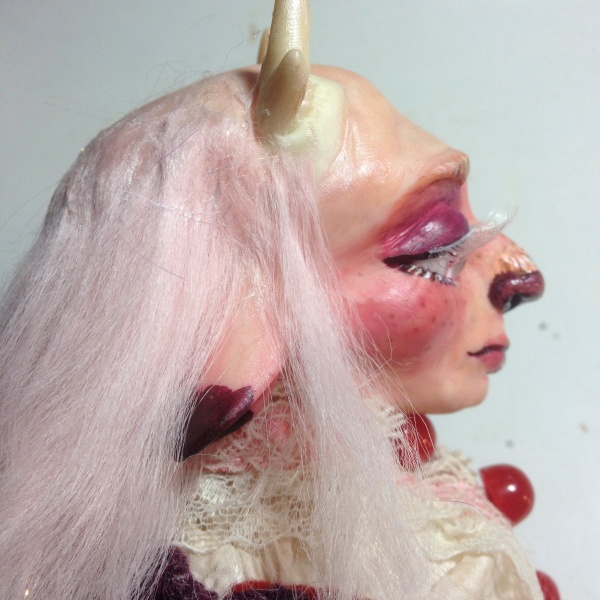
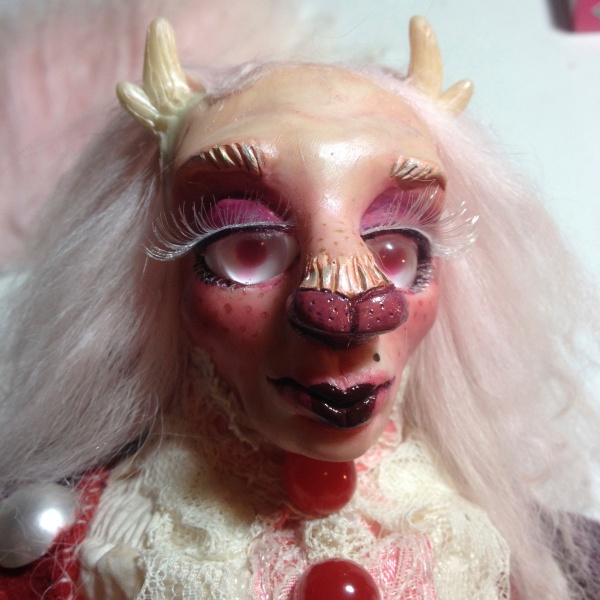
  • And lastly, through ALL of this, I have just been all the more determined to continue creating in my new art room and to wrap up some projects that have been taking me much longer than I had originally anticipated. My idea to create posable mixed-media art dolls of all three of the characters from my book is well underway. I actually just finished up Mama Kringle over the past weekend and plan on taking some quality, non-Instagram photos of her this weekend.
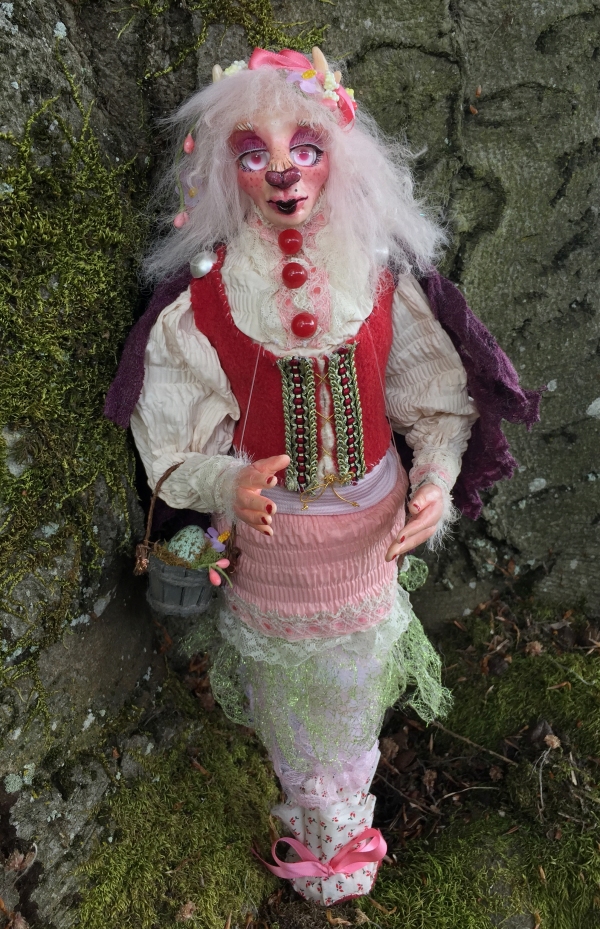
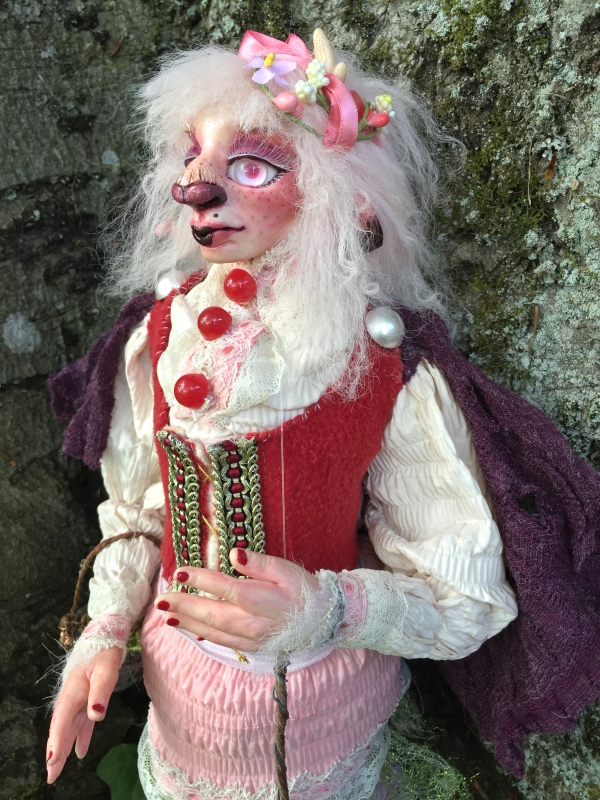
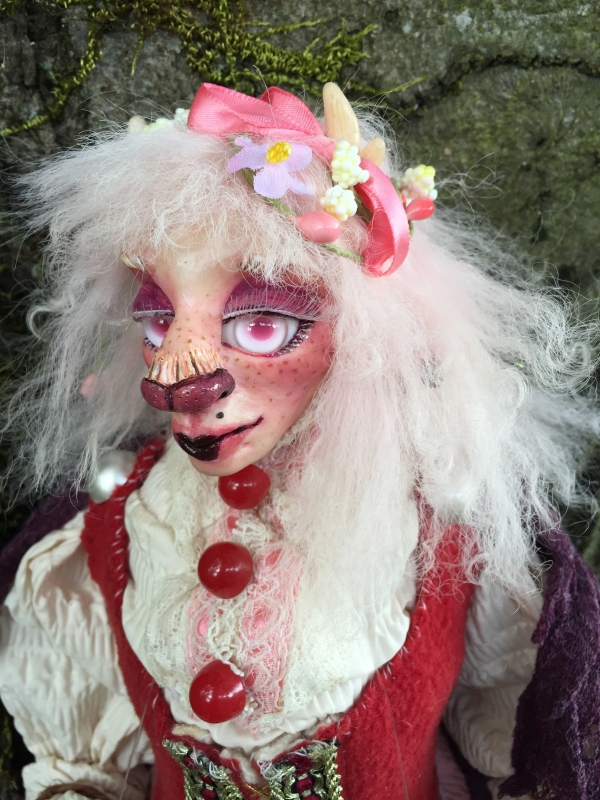
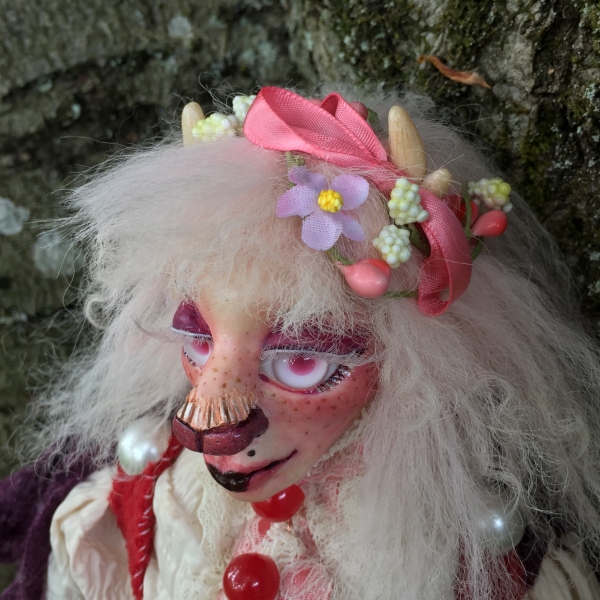
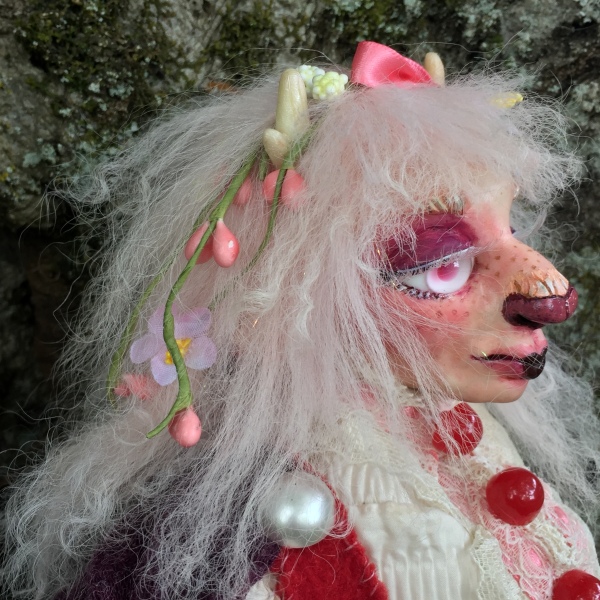
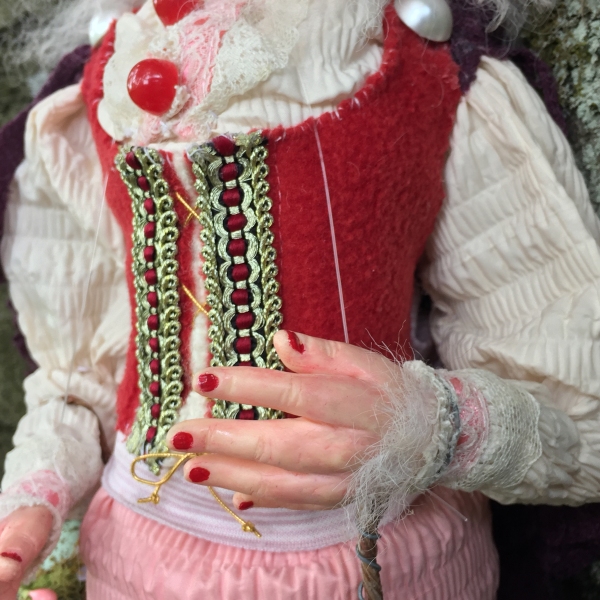
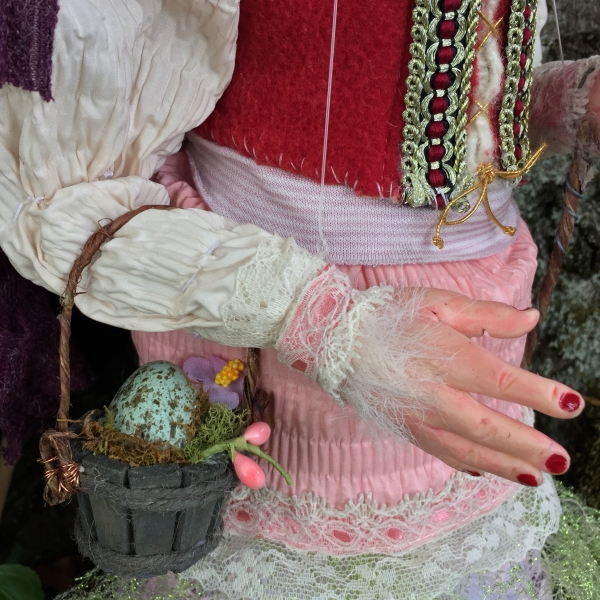
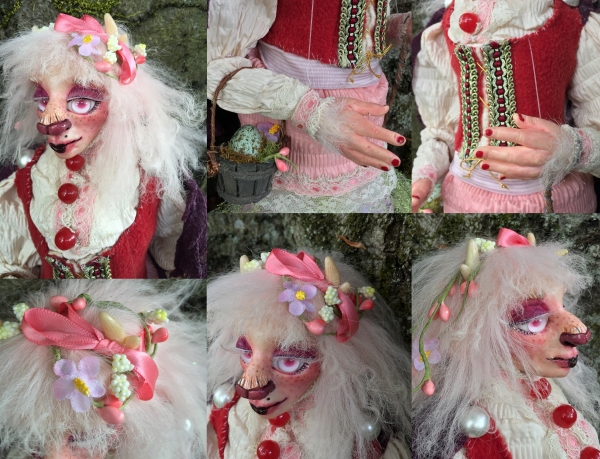
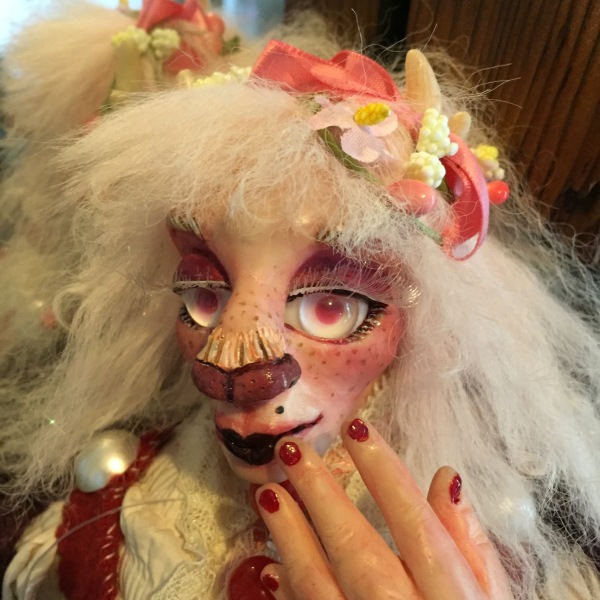
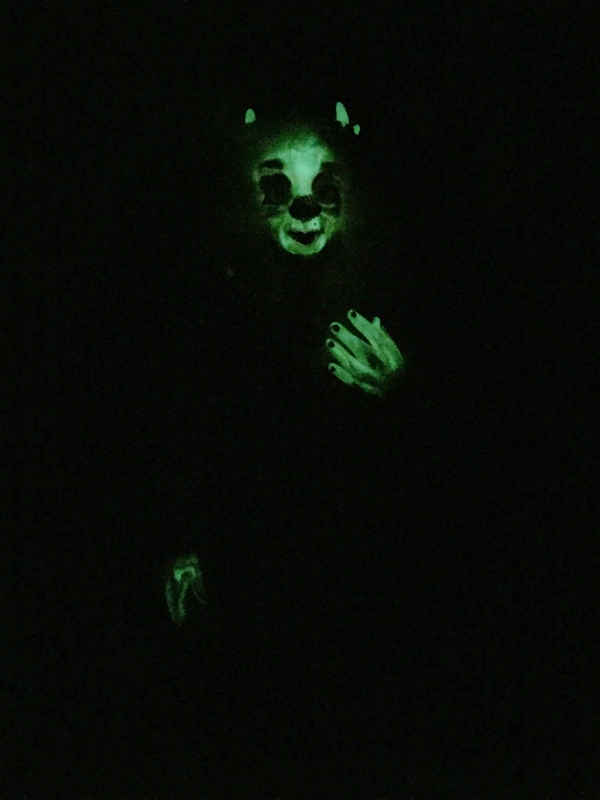
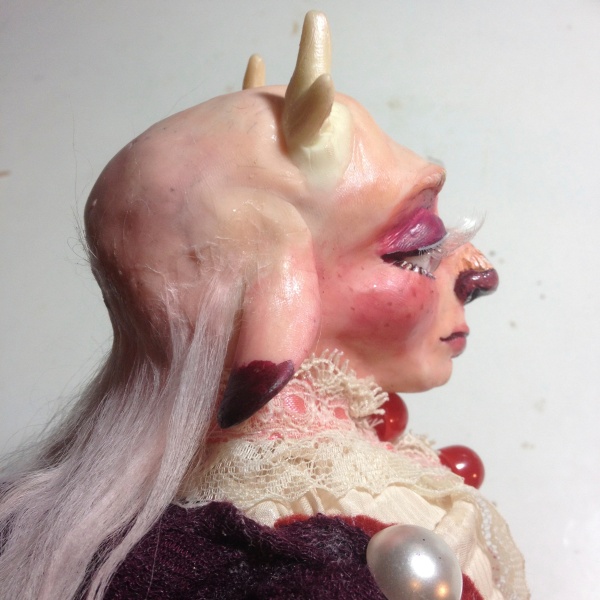
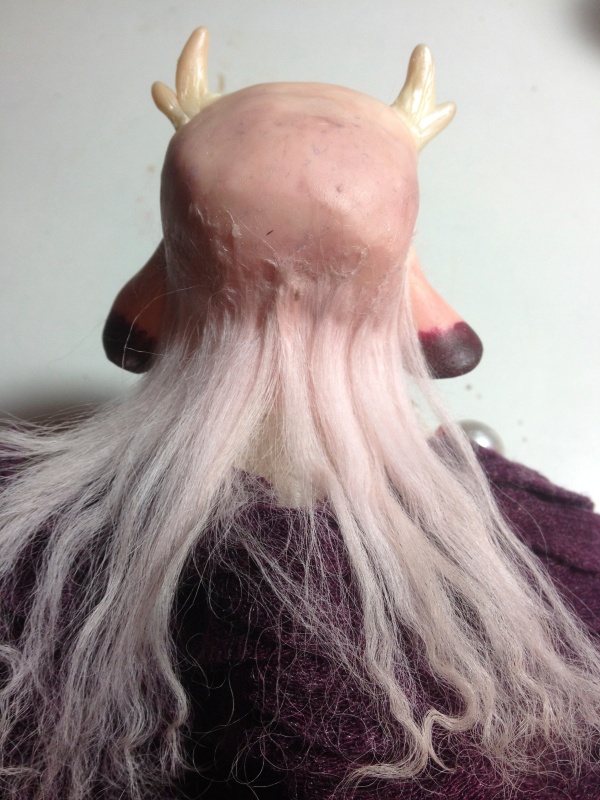
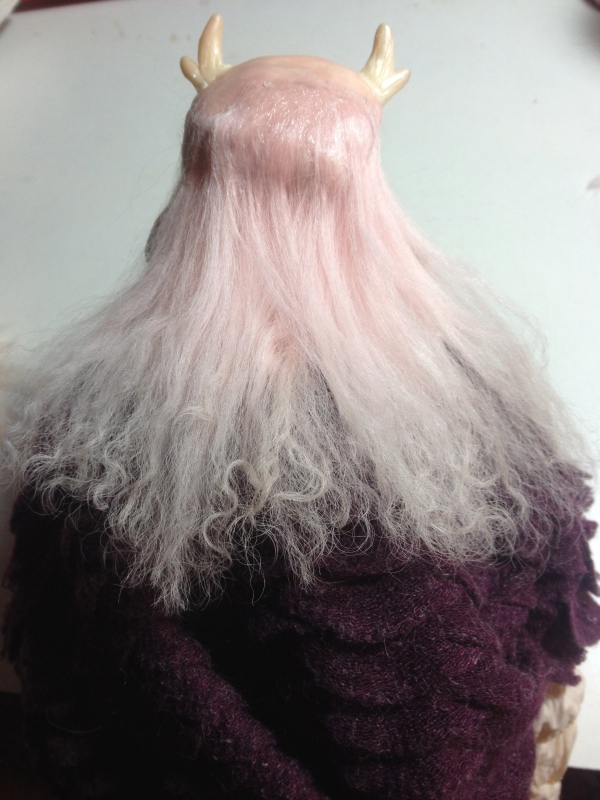
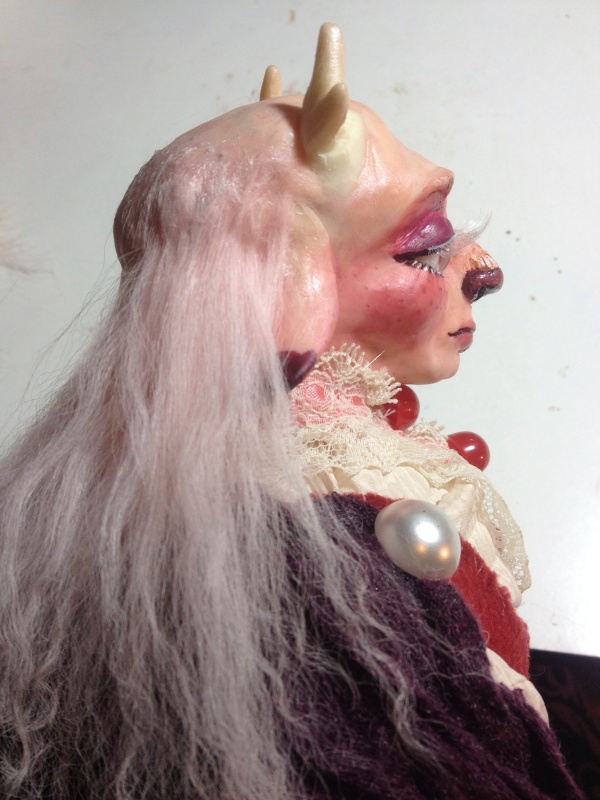
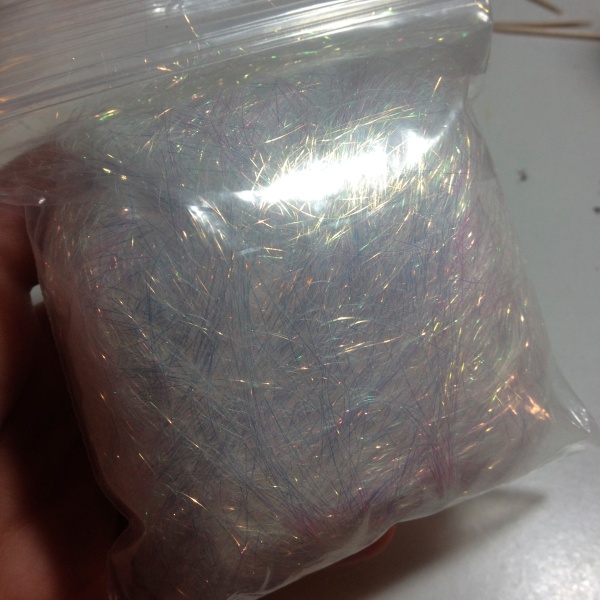
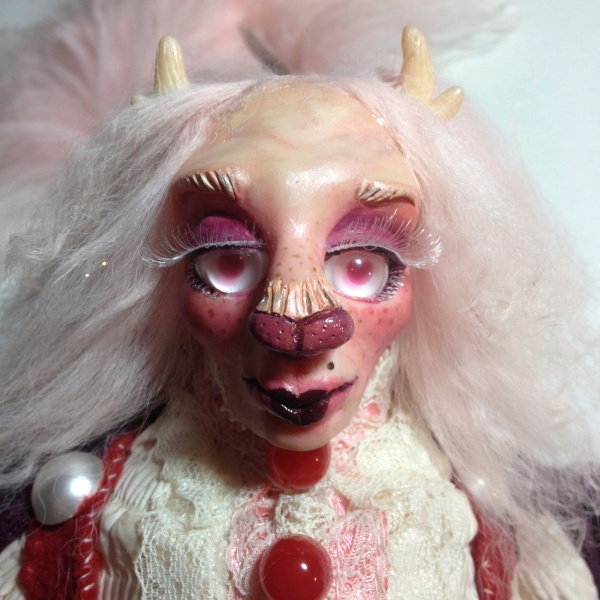
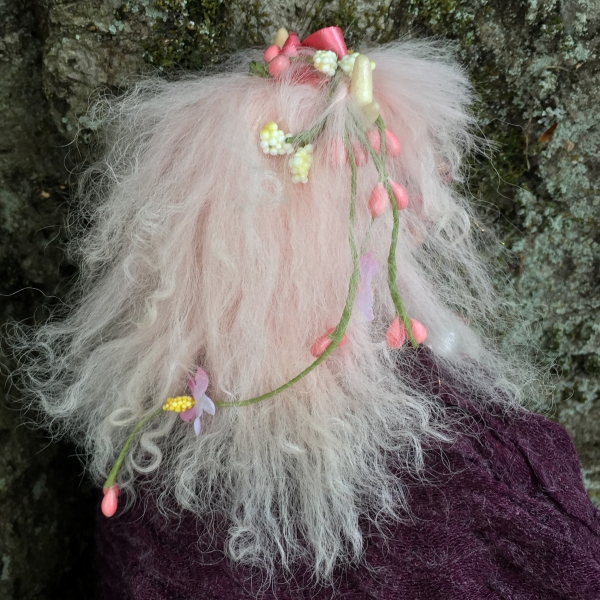
  • I also was still able to attend the Toby Froud and Wendy Froud workshop at The Fernie Brae over the past weekend. It was a completely amazing experience that I still can’t stop thinking about it. We created polymer clay and mixed-media bust sculptures of faerie creatures over the two-day workshop. Everyone’s pieces turned out to be so beautiful and so different from each other that the group photos were really something to behold. I was pretty proud of my own piece, which was a creepy Spring pooka who I have decided to name Padraig. I will also be posting some photos of him after the weekend.

So there you have it, that has pretty much been my life over the past few months. If you follow me on Facebook or Instagram all of this might have been extremely redundant, but I just felt that I needed to get the crazy catching-up post out of the way before I could return to my regular work-in-progress entries. I promise that my next post will have actual work-in-progress photos of Mama Kringle, and I actually remembered to take many of them this time! Until then, farewell, and thank you all so much for your continued understanding and encouragement. Getting all of this out has been a major relief!

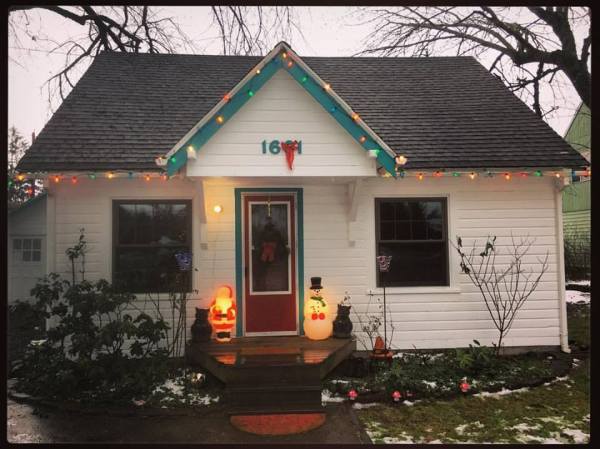
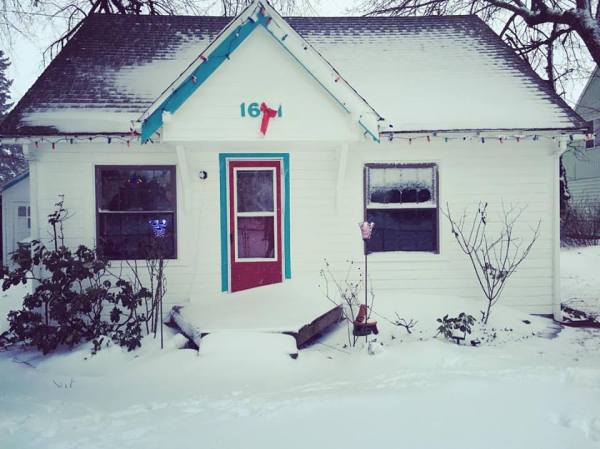
Also, here are some photos of our new house for the sake of having some photos in this post!

Redfin photo:

15285065_10101556964976897_4106905954791975293_n

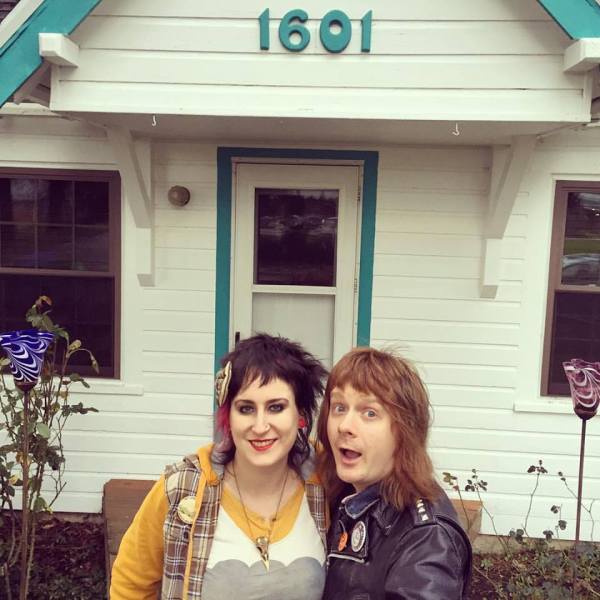
The day we got the keys:

15284119_10101556948554807_7252275862980429846_n

Grendel’s first day at our new home:

15326348_10101560741428857_8721573999991025780_n

Our house after the first couple of snowstorms:

15542066_10101591066187797_6391485364766572717_n

Our house during Portland Snowpocalypse IV:

15940686_10101624508384367_3203343792388403326_n

I need to get some Spring pictures now that the snow has finally thawed and the flowers are starting to bloom.

Oh, and here’s two last bonus photos from the book release party at The Fernie Brae!

15338857_10101578986755077_1046402515820731487_n-1

15492531_10101578986765057_3888735203684404116_n

Lucia the Puppet: Final Photos!

Published April 26, 2016 by baileyquillincooper

Here’s the moment you’ve all been waiting for…the final photos of Lucia, the rod puppet that I made at the Toby Froud workshop last week!

Lucia Full Body

Upper Body with Ear Visible

Bust

Birdseye Three Quarters

Hairbow Close Up

File_007

Back of Hair

Close Up Bodice and Hand

Close Up Basket

The crazy collage I made of all of those close-up shots:

Close Up Collage.jpg

A silly one of her looking shocked and horrified in front of my bureau mirror, because she does that so well:

File_008 (1)

If you remember, I made Lucia partially with FIMO Effect Nightglow. Here is the best picture I could get of her glowing in the dark, which was really hard to photograph and looks way more creepy cool in real life…lately I’ve been using her as a night light!

Lucia Glowing

That’s all folks!


Lucia the Puppet: Wigging and Final Details

Published April 26, 2016 by baileyquillincooper

I actually finished up Lucia the puppet very late Thursday night/early Friday morning. I basically pulled an all-nighter before my early shift and got only two hours of sleep because I was more tired of the disaster that the art room had become and was feeling really eager to get things back to normal. So anyway, this is going to be a quick post that just explains how I did the last major steps to finish her all up–her hair and a few other little details. I plan on following this post pretty much immediately with another one that will have some photos of her all finished…I took quite a few of her outside yesterday that will have to do until I can get some more professional pictures at a later date.

Before I even started on her hair I made a little accessory for her to hold on her arm. Its a little basket holding some moss, flowers, and a robin’s egg.

IMG_2629

I found the robin’s egg shell on the first day of the workshop when I was walking back to my car. Although it was just a cracked and empty shell it just looked so perfect; just like a robin’s egg candy. I decided right when I found it that I was going to try to find a way to incorporate the eggshell into my final puppet. It was very fragile so it took me a little while to figure out how I was going to do it. I ended up filling the shell with a two-part epoxy to bond it together and prevent it from crumbling. I placed it inside of a miniature basket that I purchased from Jo-Ann’s and attached that floral rope wire as a handle. Then I arranged some moss and flowers around the egg so that it would look like a little nest and also hide all of the visible cracks on the eggshell.

IMG_2630

I later added another small green twig with pink flower buds to the basket, which you will see later when I post the pictures of the finished piece.

For the wigging, or tedious attachment of her full mane of hair, I already had a cut piece of Tibetan Lamb’s Wool all picked out. I believe the color of the swatch I used was called “blushing pink” from my favorite OOAK doll supply store, The Morezmore Estate on eBay. If you’re into making OOAK polymer clay dolls, creatures, and puppets, then this is the best one-stop shop that I have ever found. The owner Natasha Red October is super nice and is a polymer clay doll maker herself so she knows her products very well. She also has a work in progress blog where she explains many of her own techniques step-by-step. I discovered her back in about 2009 when I was first teaching myself how to make really professional multi-media polymer clay dolls and was so happy when I found her blog and shop. She has taught me so much about doll making and she even sends me cool free samples of supplies whenever I order from her! Here’s a photo of the lamb’s wool I used and my other wigging supplies:

IMG_2631

One of the key things I learned from following Natasha’s blog was how to properly wig a polymer sculpt. The glue she recommends is the clear gel permanent adhesive manufactured by Beacon, Fabri-Tac. I know that this isn’t the only glue that doll artists use for this purpose–Wendy Froud and Toby Froud for instance both prefer another permanent glue called Barge. I’ve never tried Barge before, but I like Fabri-Tac well enough because it doesn’t give off any strong toxic fumes and I can use it in my small unventilated art room without much fear of killing my brain cells. The only main problem that I had with Fabri-Tac once I got past the initial figuring out how to work with such a gooey, stringy, sticky substance was how quickly it gets too thick and goopy to use while still inside the bottle (like an old nail polish that you have to throw away before you can use it up) and how darn expensive it always is. As a result you may think you’ve saved yourself some money by buying the biggest bottle with a coupon, but after you use it to wig a couple of dolls or even one human sized werewolf costume you’re probably still going to have to throw the last third of it away before you’re done with it because the consistency just becomes too difficult to work with anymore. There’s supposed to be a trick where you can add a little paint thinner to the glue once it gets all gloppy to get it back to normal for a little while. I’ve tried it and it kinda worked for me once, but I’ve found that most of the time the thinner and the glue stay separated so what you get is just a watery, not-sticky-enough mess…which is totally not worth the trouble!

Luckily I met a lady at the Toby Froud workshop last week who is the arts and crafts coordinator at the Craft Warehouse in Beaverton. She told me she get me a discount if I ask for her and clued me in on a little secret: Beacon’s 3-in-1 glue is basically the same exact glue as Fabri-tac but for a fraction of the price. I believe the only real difference between the two is that Fabri-Tac is archival quality for scrapbooking and 3-in-1 is not, but if you’re just using them to wig a doll that really doesn’t make any difference whatsoever! So I decided to take her up on that advice and just purchase a small bottle of 3-in-1 to glue the hair onto my puppet.

The way that I wig a doll is by cutting a few small locks of hair from the wool pelt and laying them out on my workspace. I then pick up each lock of hair at a time, spread a little bead of glue onto one end, roll it onto a toothpick, and then use the toothpick to press and hold the clump of hair onto the scalp until it catches, which is usually less than ten seconds.

IMG_2632

I then repeat this process again and again until I complete the first row of hair.

IMG_2635

I’ve used all different materials to apply hair to both dolls and costumes; lamb’s wool, synthetic hair from wigs or otherwise, faux fur, real animal fur, human hair, silk roving, you name it. I’ve got to say that of all the materials I have used Tibetan lamb is still my favorite. The extra fine strands are just perfect for a miniature scale and the variety of different colors and textures that you can choose from is really great for so many different projects.

The particular swatch of wool that I used for Lucia’s hair was a second quality piece that I got for a discount, which probably had something to do with the messy erratic texture that was not quite straight and not quite curly. Although it was a little frizzier than average which made it slightly more difficult to work with, I still managed to cover her scalp very evenly.

IMG_2634

After I get the first row of hair down I tug at the ends of the locks to make sure that everything is secure. Using my fingers I brush out and remove any loose flyaway hairs that didn’t hold with the rest of them.

Then I move up a couple of centimeters and start on the next row. If I want my character to have a very full and bushy head of hair (which in almost every case, I do) then I really don’t leave a whole lot of space between the two layers at all. Here she is after four or five layers of hair:

IMG_2637

As I near the crown of her head, I also start to apply the hair around her ears:

IMG_2639

While I was working on her hair I remembered that I had some really cool shimmery iridescent fibers that I wanted to try out on this puppet. I picked up a little bag of them a couple of years ago at this amazing sculpture and art supply store called Earth Guild in Asheville, North Carolina.

IMG_2640

They seemed like they would be just the right scale to mimic fairy hair sparkles/hair tinsel like I have in my own hair, so I started adding in a few bunches to Lucia’s hair here and there.

IMG_2641

The fibers ended up catching the light just like my own hair sparkles, and they were fun to hide into the locks of hair as I glued them on so you could just see little bits of sparkle poking through. I worked my way up the back of her ears and antlers. At this point she looked like she had some sort of unfortunate disease or strange medieval monk hairstyle:

IMG_2642

As I made it to the top of her head, I began to switch the direction of the hair to facing forward:

IMG_2643

When I got to her forehead I added lots more thick forward-facing hair to create face-framing layers and bangs. Unfortunately this is the last picture I remembered to take before I did that and finished her up:

IMG_2644

To cover up the last bit of glue on the crown of her head, the point where all her layers of hair meet and change direction, I did a trick where I attached a couple final locks of forward-facing hair, waited for the glue to catch, and then flipped them backwards before the glue was entirely dry. It’s another trick that I learned from reading Natasha’s blog and it’s also useful for creating a realistic cowlick, a little extra volume Jersey Shore bump-it style, or even a nice clean part if you use an Exacto blade to manipulate the glue while it is still wet. I wish I took a picture of this step but I guess you’ll just have to believe me again.

I also never took any pictures when I applied the final decorative touches to her hair–it involved arranging some floral craft wire and ribbon into an organic circlet and topping everything off with a big pink bow. Here are some close-ups of what it ended up looking like in the end, which can also serve as a teaser for the rest of the photos of the finished puppet in my next post!

Hairbow Close Up

Back of Hair